
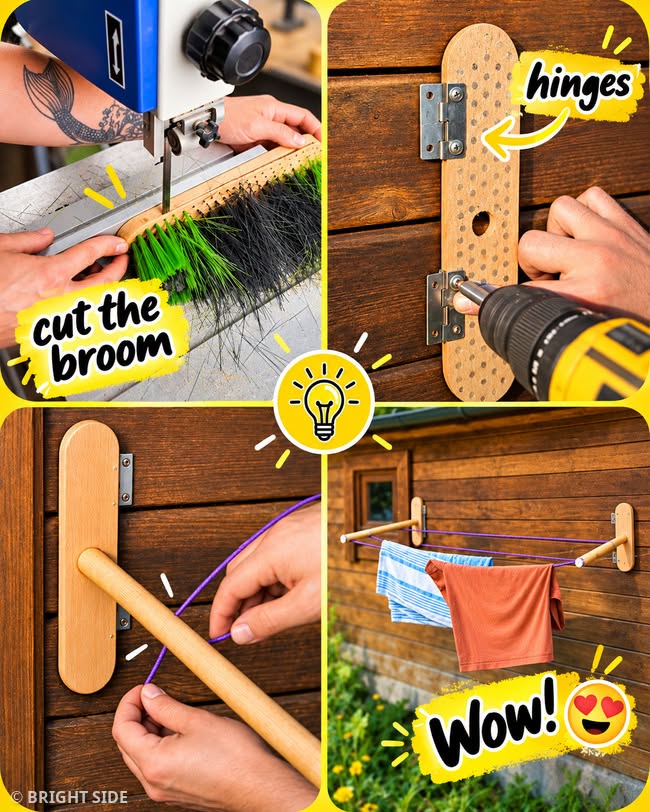
Finding practical, budget-friendly ways to organize home spaces is a constant priority for homeowners and renters alike. Indoor and outdoor laundry management often poses a unique challenge, especially in small apartments, compact backyards, or modest utility rooms. Traditional drying racks can be bulky, difficult to store, and visually cluttered.
Fortunately, simple DIY home hacks offer brilliant solutions by turning everyday, discarded household tools into highly functional organization systems. In this step-by-step guide, we will explore how you can upcycle a simple wooden broom head into a wall-mounted, foldable clothes drying rack. We will cover the materials needed, step-by-step assembly instructions, safety tips, and how upcycling projects contribute to home value and sustainable living.
The Upcycling Movement: Why Repurpose Household Items?
Upcycling—the process of converting old or discarded materials into products of higher utility and aesthetic value—has surged in popularity over recent years. Rather than throwing away broken or worn-out items, creative DIY enthusiasts are finding clever ways to extend their lifecycle.
Repurposing items like old wooden broom heads offers several key benefits:
Cost Efficiency: Building custom storage solutions with upcycled materials eliminates the need to purchase expensive retail drying racks or wall organizers.
Environmental Sustainability: Diverting plastic, metal, and wood waste from landfills actively reduces your household’s overall carbon footprint.
Customization: DIY projects allow you to tailor dimensions, finishes, and colors to match your home’s exact aesthetic and space requirements.
Step-by-Step Guide: Building a Foldable Wall-Mounted Drying Rack
Creating this space-saving clothes drying rack requires minimal tools and basic woodworking skills. Here is everything you need to know to complete the project successfully.
Materials and Tools Required
An old wooden broom head (bristles removed)
Two sturdy metal door or cabinet hinges
Screws suitable for wood and wall mounting
Electric drill and screwdriver bits
Saw (bandsaw or hand saw)
Durable clothesline rope or paracord
Sandpaper and protective wood varnish
Step 1: Cutting and Preparing the Broom Base
Start by taking the wooden broom head and removing all bristles. If using a brush with synthetic bristles, trim them close to the base or pull them out completely using pliers. Use a saw to trim the broom head to your desired length, creating two symmetrical wooden backing plates. Sand down all rough edges to ensure a smooth finish that won’t snag delicate clothing items.
Step 2: Attaching the Hinges
Position small metal hinges on the back of each wooden plate. Secure the hinges firmly using wood screws and an electric power drill. Ensure the hinges pivot smoothly, as this allows the drying rack arms to fold flat against the wall when not in use.
Step 3: Mounting to the Exterior Wall
Align the hinged wooden plates against a sturdy exterior wall, wooden shed, or laundry room panel. Ensure the brackets are level before drilling pilot holes into the wall structure. Secure the hinges into the wall surface using heavy-duty anchors or direct wood screws to provide sufficient weight capacity for wet garments.
Step 4: Stringing the Clothesline
Insert the original wooden broom handles into the mounting holes on each wooden plate to act as support arms. Thread a high-tensile strength clothesline rope or cord between the two extended arms, tying secure knots on each end. This creates a tight, suspended drying line capable of supporting wet towels, shirts, and everyday laundry.
Financial and Financial Security Benefits of Home Improvement
Engaging in functional DIY home projects does more than save money on daily supplies—it can positively impact your long-term personal finance goals.
Boosting Property Value and Appeal
Maintaining a clean, well-organized living space enhances home appeal. Minor interior updates, smart storage solutions, and neat outdoor utility areas contribute to overall property value, making your home more attractive if you ever decide to apply for a mortgage refinance, secure a home equity loan, or list the property on the real estate market.
Insurance and Safety Considerations
When performing DIY home modifications, safety and structural integrity are paramount. Poorly mounted heavy fixtures can pull away from walls, causing structural damage or injury. Homeowners should verify that exterior installations do not breach property line boundaries or void home insurance terms. For extensive renovations involving electrical, plumbing, or major structural alterations, consulting a licensed contractor or legal attorney specializing in real estate ensures full building code compliance.
Practical Tips for Maintaining Upcycled Wood Projects
Apply Outdoor Weatherproofing: If mounting your drying rack outdoors, apply a clear waterproof sealant or exterior wood varnish to prevent rot, mold, and weather damage.
Check Weight Limits: Avoid overloading the paracord line with excessively heavy items like wet carpets or heavy winter coats to prevent strain on the hinges.
Use Sandpaper for Smooth Edges: Always sand down wooden components thoroughly to avoid splintering, which can damage fabrics during drying.
Inspect Fasteners Periodically: Tighten wall screws and hinge bolts every few months to maintain peak structural stability.
Fascinating Facts About Laundry and Home Hacks
Energy Savings: Line-drying clothing instead of using a heated tumble dryer can reduce household utility energy consumption by up to 30% annually.
Fabric Longevity: Air-drying clothes preserves fabric elasticity, prevents heat shrinkage, and extends the life of delicate athletic wear and natural textiles.
Historical Origins: Early laundry drying racks in the 19th century were called “clothes horses” and were typically constructed entirely from untreated timber frames.
Conclusion
Transforming an old broom head into a wall-mounted foldable drying rack is an ingenious, eco-friendly weekend project. It combines clever utility with minimal costs, helping you maximize living space while reducing your environmental impact.
By taking simple materials and applying a bit of hands-on creativity, you can build custom, long-lasting storage solutions that make everyday home management easier and more efficient.
FAQ Section
Is a wooden broom head strong enough to hold wet clothes?
Yes, high-density wooden broom bases secured with sturdy metal hinges and proper wall anchors can easily support typical wet garments such as t-shirts, towels, and underwear.
What type of rope is best for an outdoor drying rack?
Synthetic cordage like standard paracord, heavy-duty nylon line, or plastic-coated steel wire works best because it resists fraying, stretching, and UV weather damage.
How do I fold the rack away when not in use?
Because the base plates are attached with movable hinges, you can simply unhook the support arms or swing the wooden plates flat against the wall surface.
