
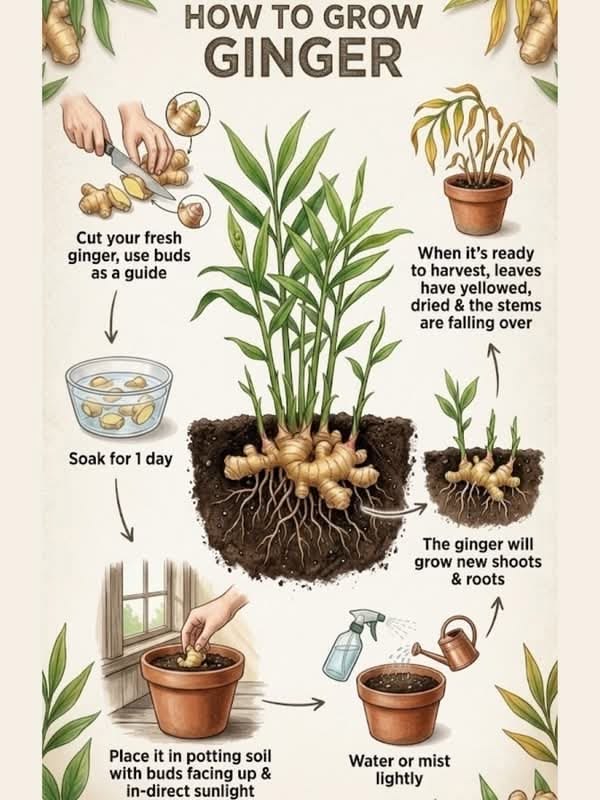
Fresh ginger (Zingiber officinale) is a versatile tropical perennial that thrives in warm indoor spaces and container gardens. Growing ginger at home from store-bought rhizomes is an easy, budget-friendly gardening project that provides homegrown flavor for cooking, teas, and natural health remedies.
The infographic above illustrates a step-by-step method for planting, growing, and harvesting ginger roots. Below is a detailed breakdown of each step, optimal growing conditions, and practical tips for a successful harvest.
Step-by-Step Planting & Growth Breakdown
+-------------------+---------------------------------------+---------------------------------------+
| Growth Stage      | Action Illustrated                    | Gardening Rationale & Best Practice   |
+-------------------+---------------------------------------+---------------------------------------+
| 1. Selection      | Cut fresh ginger using buds as guide  | Ensures active "eyes" for new shoots  |
| 2. Preparation    | Soak in water for 1 day               | Hydrates rhizome & removes inhibitors |
| 3. Planting       | Place in soil with buds facing up     | Positions shoots correctly in soil    |
| 4. Watering       | Water or mist lightly                 | Prevents rot while maintaining moisture|
| 5. Sprouting      | Ginger grows new shoots & roots       | Active growth phase in indirect light |
| 6. Harvesting     | Harvest when leaves yellow & dry      | Signals rhizome maturity (8–10 months)|
+-------------------+---------------------------------------+---------------------------------------+
Key Care Requirements
-
Soaking the Rhizome: Soaking store-bought ginger in warm water overnight serves two purposes: it rehydrates dried rhizomes and helps wash away chemical growth inhibitors often sprayed on commercial produce to prevent premature sprouting.
-
Lighting Needs: Unlike many sun-loving garden crops, ginger prefers filtered, bright indirect sunlight or partial shade. Direct, harsh sunlight can scorch its delicate bamboo-like leaves.
-
Soil & Moisture Control: Ginger needs rich, well-draining potting soil mixed with compost. Because ginger rhizomes rot easily in waterlogged soil, misting or light watering is critical during the initial sprouting phase.
Step-by-Step Planting Instructions
-
Prep the Ginger: Select a plump piece of fresh ginger root with several visible growth buds (“eyes”). Cut it into 1- to 2-inch pieces, ensuring each piece has at least one strong bud.
-
Soak Overnight: Place the cut pieces in a bowl of warm, filtered water for 12 to 24 hours to stimulate root initiation.
-
Plant in Potting Soil: Fill a shallow, wide pot (with drainage holes) with rich, well-draining soil. Place the ginger rhizome 1 to 2 inches deep, ensuring the growth buds face upward.
-
Water Lightly: Keep the soil consistently moist but never soggy. Use a spray bottle to mist the surface until shoots appear above the soil.
-
Harvest at Maturity: After 8 to 10 months, when the leaves yellow, dry out, and begin to fall over, stop watering and carefully dig up the mature rhizomes to harvest.
Fact Check & Growing Tips
-
Pot Selection Matters: Ginger grows horizontally rather than deep. Choosing a wide, shallow container allows the rhizome network to expand easily under the soil surface.
-
Temperature Sensitivity: Being a tropical plant, ginger thrives in temperatures between 21°C and 30°C (70°F–85°F). Bring potted ginger indoors before the first frost in cooler climates.
Frequently Asked Questions (FAQ)
Can I harvest ginger before the leaves dry out?
Yes! You can carefully unearth small pieces of “baby ginger” after 3 to 4 months of growth without killing the main plant. Tender baby ginger has a milder flavor and thinner skin.
Why is my ginger plant not sprouting?
Ginger takes patience—sprouting can take anywhere from 2 to 6 weeks depending on ambient temperature and humidity. Ensure the pot is kept in a warm spot with indirect light.
